Tuesday, September 30, 2008

Brie with Caramel-Pecan & Pear Sauce

Brie with Caramel-Pecan & Pear Sauce


I love brie and when I saw this new brie log at the grocery store I was so excited. I always use brie to make appetizers for parties but now I have a log of brie to make perfect round slices that will beautifully fit on crackers or baguette rounds. Here's a simple version of a brie appetizer that I served at my restaurant. It can be made quickly and can be served at room temperature so it's perfect for a buffet table at your next party.


Brie with Caramel-Pecan & Pear Sauce:
1 log brie cheese (if you cannot find the log of brie, you can just use the brie round and make slices that will fit on a cracker, they don't have to be round slices)

15-20 crackers or french baguette slices
1/4 cup sugar
4 tablespoons butter
1/4-1/2 cup pecan halves or pieces
2 tablespoons half n half
2 small pears or 1 large pear, peeled and cut into small chunks

These pears are from our own pear tree!
In a small pan, start heating up the butter and sugar together until the sugar dissolves. Add the pecans and continue to mix and coat the pecans in the sugar mixture. Once the mixture starts to turn a golden brown turn the heat down to low, add the half and half and mix well. Add the chopped pears and continue to mix until the pears soften and are coated in the caramel mixture.
To assemble the appetizers, place a piece of the brie on top of the cracker or baguette and top with the caramel pecan & pear sauce.


This is definitely a winner!

Monday, September 29, 2008

Mini Quesadillas

Mini Quesadillas

Here's a great recipe for any party or get together you're having. They definitely go over well at game day parties and they look so cute!

Mini Cilantro-Lime Chicken Quesadillas:
2 whole chicken breasts, prefer bone-in

I prefer bone in because then you make a really good chicken stock at the same time!


4 tablespoons olive oil
2 tablespoons chopped cilantro
2 tablespoons chopped garlic
1 lime
2 teaspoons jalapeno sauce
1 teaspoon salt
1 cup shredded Gouda (or any cheese that you like)

I used Gouda because it melts nicely but doesn't melt too much so that it gushes out of the mini quesadillas. I also like the mix of gouda and cilantro.

4 large tortillas (I like using different flavors for the mix of colors, but just plain flour tortillas work, too)

Start by boiling your chicken breasts. Make sure to add salt to the water so the chicken gets some flavor in it. I boil the chicken breasts for about 1 hour that way I also get a good chicken stock out of the deal. And don't throw away this stock. I used it later to make rice (by substituting the water with the stock and believe me...this makes the best rice you'll ever have!) You can also freeze the stock and make soup with it later.

See the nice stock that's forming? Also, my prep cook Maribel says they use boiled chicken a lot for Mexican dishes because the meat stays moist and you can add any flavor to the meat with different sauces and spices and make several different dishes with one big batch of boiled chicken.


While your chicken is cooking, make your cilantro-lime sauce by mixing the olive oil, garlic, cilantro, salt and jalapeno sauce in a bowl. Top it off by squeezing the lime juice into the sauce.


I like using jalapeno hot sauce because it adds a unique flavor to my cilantro-lime sauce. If you can't find this sauce, you can add any of your own favorite hot sauce instead.


To make the mini quesadilla tortillas, take your large tortillas and either use a cookie cutter or any small round bowl and cut out your quesadilla circles.
You'll have some extra pieces of tortilla left from cutting out circles, you can cut these pieces to make fresh tortilla chips later either by frying them or baking them so you don't have to waste any of the tortilla.

Once the chicken breasts have boiled and are cooked, remove them from the water and using two forks, take off the skin from the breasts and start shredding off the chicken meat with the two forks.
While the chicken is still hot, toss the meat in your cilantro-lime sauce. You can now begin to assemble your mini quesadillas. To assemble the quesadillas, begin with a little cheese then add your chicken and then more cheese and top with another tortilla circle.
When you place the top tortilla on, make sure to flatten it just a bit to help "glue" the quesadilla together.
Fry the mini quesadillas in a non-stick pan that's been sprayed with oil.
Flip them when they are golden brown. These don't take long to cook and can be kept warm by placing them on a pan or plate and covering them with foil. Just make sure to poke a few holes in the foil so the quesidillas don't get soggy and stay crisp.

I also made some beef and cheese quesadillas for my party. I had some leftover ground beef that was seasoned with just salt, pepper and garlic. I used a shredded mexican blend cheese for the beef quesadillas.

I made the beef and cheese quesadillas a little smaller for variation.
It's ok if some of the cheese falls out when you are frying up your quesadillas.

Some of the cheese that has fallen out will get golden and crispy and stick to your quesadilla which will just give it more flavor.


I cut up some Roma tomatoes and avocado and placed them on the tops of the quesadillas with a skewer for added flavor and color.
Serve your quesadillas with some shredded lettuce, salsa and sour cream. I promise these will be a hit at your next get together!


Doesn't this look so good?!?

And when you take a bite.....it looks and tastes even better!!!

Friday, September 26, 2008

Plantains Foster

The star of the show

And the co-stars

They had a sale on plantains so I decided to buy a couple. I love plantains but rarely use them. Plantains are in the banana family but I guess you're not supposed to eat them raw. They have to be cooked to eat them and as they get riper, they get softer and sweeter. The ones I got were a bit ripe, but that was fine as I wanted to make a dessert with them anyways. I decided to make Plantains Foster...the rum in the cabinet was calling my name.....

They kinda look like banans don't they...

Avesta's Plantains Foster:
2 ripe plantains, cut in half then cut lengthwise
1/2 cup brown sugar
6 tablespoons butter
1/2 orange
1/4 cup spiced rum
butter pecan ice cream (really you have to try it with this ice cream)

Melt the butter and sugar in a heavy skillet over medium heat.

Stir until the sugar dissolves and the mixture is turning golden.

Add the plantains and let them cook without disturbing for 2-3 minutes.

When you turn the plantains over they should be a nice golden brown and are caramelized. Let them cook on the other side for another 2-3 minutes.

Take the pan off the stove and add the rum. If you have a gas stove when you put the pan back on the stove, slightly tip the pan so that the mixture catches on fire. If you have an electric stove then use a long match or long lighter and catch the mixture on fire. Let the flames die out and and cook the mixture for about 2 mintues to let the alcohol evaporate.

I couldn't get the flames in the picture because it's such a quick step and I do all the cooking & photos myself. I'm saving for a better camera & tripod!

Turn the heat off and squeeze the orange juice all over the plantains.

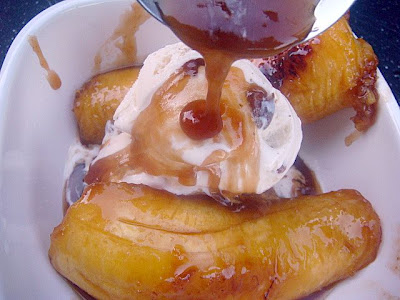
Serve by placing the plantains around a scoop of the Butter Pecan ice cream and drizzling the sauce all over the top. You can top it off with whipped cream if you'd like.


See how nice and carmelized the plantains turned out...that brings out such yumminess!


You must try butter pecan ice cream with this recipe!

Thursday, September 25, 2008

Trying out Gluten-Free Pasta

Gluten Free, Wheat Free & Casein Free Organic Elbows
with Marinara & Steamed Broccoli


This gluten free pasta is even organic...BONUS!

Neither my son nor I have Celiac Disease, a disease where those who have it basically are allergic to gluten, therefore unable to eat wheat, barley & rye. But as a chef, I have come across so many people in the last few years who have asked me about gluten-free items and choices.

I am really interested in developing some homemade gluten-free recipes, especially with using rice flour as it is a staple in the Middle East. But for now, I am just trying to get to know more about the disease and as my son and I were walking through the grocery store the other day, he noticed pasta made of corn.

I love that my son is very interested in food, especially new foods and items that seem interesting. I've talked a little to him about Celiac Disease and he noticed that the bag said "gluten-free" so he definitely wanted to try the pasta because when I told him about the disease, he couldn't imagine living life without pasta, bread, cakes, etc. I explained to him that now there are many gluten-free choices out there and he seemed to still question the whole idea of living gluten-free.

I was excited to make the pasta because I wanted my son to realize that there is life without gluten, and if there is a dietary restriction of any kind, there are solutions and choices especially in today's day and age. And I love when he tries new things, it opens his mind and his taste buds, which I absolutely adore


Boils like regular pasta...but has this beautiful yellow color.

The final dish topped with a chunky marinara & shredded mozzarella & served with steamed broccoli.

Taste Test.......

......here goes.....

I think this is a good sign.....

So even though we are not allergic to gluten, I've been researching the benefits of eating gluten free. I may not completely go gluten free but hey, why not incorporate some gluten free items in our diet. And when gluten free looks like the dish below...I'm there!