Thursday, January 29, 2009

Cajun Chicken Legs

Spicy Cajun Chicken Legs


This month I've been loving chicken and loving spicy food so here's a quick recipe that will win over the crowd. You can use this seasoning on any kind of chicken, whether it's on the bone, off the bone, breasts, legs, wings, whatever your heart desires! It's great to have in the spice rack to use to kick things up a bit...it's especially good sprinkled in any creamy pasta sauce!

For Cajun Chicken Seasoning:
(this will make more than you need so store the rest in a container for later use)

2 tablespoons paprika
1 tablespoon saltdiv>1 tablespoon ground hot red pepper
2 teaspoons black pepper
2 teaspoons cumin
2 teaspoons garlic powder
2 teaspoons onion powder
1 teaspoon dried oregano
1 teaspoon dried thyme
1 teaspoon dried parsley

Combine all ingredients and store in an air-tight container


Wash your chicken and then sprinkle with just a little salt. Then make sure to rub the chicken with your Cajun seasoning. I like to make sure there's a nice coat of it on there. Then I drizzle the chicken with a little olive oil and sprinkle the top of the chicken with more paprika because I love that red color it gives the chicken.


If you're using chicken legs, cover your baking dish with aluminum foil and bake at 350 degrees for 30 minutes then remove the aluminum foil and turn oven up to 375 degrees and bake for another 15-20 minutes or until the chicken is completely done and the skin is nice and crispy.

Saturday, January 24, 2009

Peppermint n Chocolate Chip Cookies

Peppermint n Chocolate Chip Cookies

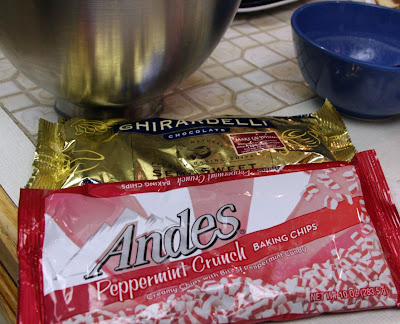
I was in the grocery store the other day and found some different Andes baking chips. These were peppermint and cream baking chips and I knew right away that I had to try them in a cookie recipe. I bought several bags and made cookies with both semi sweet chocolate chips and white chocolate chips. Both recipes turned out great! The cookies were very flavorful and I also loved the color that the peppermint chips added to this cookie. These would be great to make for Valentine's Day! I'd be your sweetie if you made me a batch of these!!!

Peppermint n Chocolate Chip Cookies
1/2 cup salted butter, softened
3/4 cup dark brown sugar
1/2 cup white granulated sugar
1 teaspoon baking soda
1 teaspoon baking powder
2 teaspoons vanilla extract
2 eggs
1 bag Andes® Peppermint Baking Chips
1 bag semi sweet chocolate chips or white chocolate chips
2 cups all-purpose flour
2/3 cup cake flour
Blend butter, sugars, baking soda, baking powder, vanilla and eggs until mixed.
Stir in baking chips and then flour.
Chill for at least one hour in refrigerator.


Preheat oven to 350
Put a heaping round spoonful of dough on a parchment paper lined baking sheet.

Bake at 350-degrees for about 8-10 minutes (don't overcook!)

Cool on the baking sheets for about 3-5 minutes before removing.

I think these would be great in white cupcakes too for Valentine's Day!

Don't you just wanna dive into this pool of goodness?

Make sure to chill your dough...I promise it makes a difference!


They turned out just perfect!

See the pinkish red color...that's why these are perfect for Valentine's Day!

I love when the chocolate chips are all melty and gooey on top of a cookie...I grabbed this baby and ate it before anyone else could get to it!


Tuesday, January 20, 2009

Lamb & Green Bean Stew

Lamb & Green Bean Stew

As I've mentioned before, I'm Kurdish and one of the key dishes in any meal is the "stew" that is served. In a lot of Mediterranean and Middle Eastern cuisines, this stew is often served over rice and can be the main dish or as a side dish. Growing up, when my mom made a simple meal, it was basically a pot of stew and a pot of rice on the stove and that's what we ate almost every night. There's all kinds of stews, some with meat and veggies and some with just veggies but none of them is without flavor. Another great thing about these stews is that you can make a big pot and freeze small portions for later use. This recipe calls for lamb but you can make it with beef or chicken or if you're vegetarian, substitute the meat with potatoes.
Lamb & Green Bean Stew:
1 pound whole fresh or frozen green beans
1 pound lamb meat (you can use boneless cubed or on the bone, I use a combination of some boneless and some on the bone)
2 tablespoons tomato paste
1 onion (diced small)
2 cloves garlic (minced)
1 can diced tomatoes (do not drain)
1 teaspoon cumin
2 tablespoons lemon juice
1-2 teaspoons cayenne pepper (optional)
2 tablespoons olive oil
salt & pepper to taste
Salt and pepper the lamb well and in a large pot, heat the olive oil on medium-high heat and brown the lamb meat. Once the lamb is nice and browned, add the onion and then add the garlic.
After the onion and garlic are slightly golden, turn the heat down to medium and add the diced tomatoes and tomato paste. Add salt and pepper to the tomatoes and saute while stirring. Then add the cumin and cayenne pepper to the mixture and stir in the green beans.
Add 3-4 cups of water (enough so that the meat and green beans are covered) and mix well. Bring to a slight boil then turn down heat, add lemon juice and simmer covered for about 45 minutes to an hour or until the meat is nice and tender and the stew has reduced and thickened. Taste the stew to make sure it has enough salt once it has reduced, if not, add more. If the stew is too salty, add a little water. Serve over rice for a delicious meal!
I like keeping the green beans whole in this recipe, though you can cut them up or use frozen cut green beans if you'd like. If you're using fresh green beans, make sure to snip off the stems first.
If you don't like lamb, please by some good quality lamb (free range or organic) and try this recipe. The lamb will be so tender and flavorful, you will fall in love!


Stir your stew a few times while it is simmering. 
Serving this stew over rice will give it that real Middle Eastern touch. If you don't like rice or are going low carb...the stew is still amazing served by itself in a bowl!


Wednesday, January 14, 2009

Baked Coconut Curry Chicken

Coconut Curry Chicken


If you ever ate at my restaurant Avesta Eclectic Cuisine then you may have tried one of our most popular dishes, Curry Chicken. My Curry Chicken was a little different than traditional Indian Curry Chicken but ended up being one of our biggest hits. I have been missing the restaurant a lot lately and decided to make a simpler & quicker version of that Curry Chicken. So if you are one of those loyal customers and have been dreaming of Avesta's Curry Chicken...try this recipe while sipping on a Pomegranate Martini and reminisce about those fun nights in Delaware, Ohio.

Baked Coconut Curry Chicken


2 1/2 pounds chicken (I use chicken legs and boneless, skinless thighs & breasts, but you can use whatever combination of chicken you enjoy most)


1 can coconut milk


2 cups chicken broth


2-3 teaspoons cayenne pepper (depending on how hot you like your food)


2 tablespoons curry powder (again depending on how much you like curry)


1 teaspoon garlic powder


1 tablespoon sugar


salt & pepper to taste


Preheat oven to 375 degrees


Wash and pat dry the chicken with a paper towel. Pour the chicken broth and coconut milk in a baking dish then lay the chicken in the broth. Sprinkle with salt and pepper. Then sprinkle the rest of the spices all over the chicken and broth.


Cover the baking dish tightly with aluminum foil. Bake for 30 minutes. Remove the dish from the oven, carefully remove the foil and turn chicken and mix up the broth mixture so the coconut milk breaks up. Put the baking dish back in the oven uncovered for another 30-45 minutes or until the chicken is fully cooked and very tender.


I cook this chicken a little longer than necessary because I like the thighs and breasts to sort of shred and since the chicken is in a broth, it does not dry out with the extra cooking time.


Once you remove the baking dish from the oven, carefully pour the sauce into a saucepan and add 1 tablespoon butter. Mix using a whisk, bring the sauce to a boil and whisk till smooth and reduced. Taste the sauce to make sure it is spicy enough for your liking...if not...add more cayenne pepper and curry powder. Serve chicken over rice and pour the sauce over the chicken and rice.


This recipe is easy and quick because you basically throw everything in the baking dish.

As the Curry Chicken bakes the sauce starts forming, this is why you pull it out half way through the baking process to give the sauce a mix and turn the chicken.

To thicken the sauce, you pour it in a pan and bring it to a boil and let it reduce. The sauce should be a little spicy and a little sweet.

I sprinkle the top of mine with extra cayenne pepper. I like my curry to be super spicy!


If you don't like using chicken on the bone, you can use just boneless chicken but I do advice you use both breasts and thighs as breasts do tend to be more dry and the dark meat really adds to the dish. If you use all boneless meat, before serving, shred the chicken and mix up the dark and white meat. If you are vegetarian, substitute the chicken with tofu chunks or veggies, but obviously you won't need to cook these as long as chicken.


Still delicious the next day! I like pouring some sauce on my rice the night before and letting it soak up the sauce then warming it up the next day......talk about good stuff! I think it's even better the next day after the rice soaks up all that flavor!!!!

Friday, January 9, 2009

Brown Sugar & Bacon Glazed Chicken

Brown Sugar & Bacon Glazed Chicken


Happy New Year Everyone! For my first recipe of 2009...I am posting one of my all-time favorites...I absolutely love roasted chicken but the key is cooking it correctly and making sure it has flavor! I also have a big love for bacon and often use it to add flavor to my dishes. This roasted chicken recipe has it all...it is moist, flavorful with the essence of the smoky bacon, the sweetness of the brown sugar and the spiciness of the cayenne pepper! I'm telling you...this is a winner and you will have a hard time not eating the whole chicken while it still sits in the roasting pan! YUM!
Brown Sugar & Bacon Glazed Roasted Chicken
1 1/2-3lb Whole Chicken
4-6 thick slices of bacon
1 tablespoon olive oil
Kosher salt
pepper to taste
Brown Sugar Glaze
1/4 cup packed brown sugar
2 tablespoons butter
1 tablespoon honey or maple syrup
pinch of cinnamon
pinch of salt
cayenne pepper to taste (optional but oh so good!)

Preheat oven to 375 degrees
Rinse chicken inside and out under cold running water and pat dry with paper towels.
Place the chicken into a roasting pan (breast side up) (I use my ceramic roaster that has a lid but you can use whatever roasting pan you have or just use a baking pan and you can cover the chicken with aluminum foil)
Rub the top of the chicken with the olive oil and sprinkle plenty of salt and as much pepper as you like over the chicken. Now make sure to use plenty of salt...remember when roasting meats a lot of the salt is drawn out of the meat.
Roast the chicken with the lid on for 1 to 1 -1/2 hours or until the chicken is done. Remove the lid and baste the chicken once or twice while cooking. After an hour to 1 1/2 hours, raise the oven to 450 degrees and continue roasting for another 30 minutes with the lid off, to a minimum internal temperature of 180 degrees (make sure to take the temp at the thigh).
In a small sauce pan, melt 1 tablespoon of butter with 1 tablespoon of flour to make a roux.
Once the butter is melted and the mixture is golden brown (not dark brown) add the juices from the baked chicken and bring to a slight boil while stirring.
Taste the sauce and make sure it is seasoned well.
Carve the chicken and pour a little of the sauce on top of the chicken.
This chicken will blow you away!!!!

This glaze is simple!

Make sure to cook the glaze until it thickens.

Once the glaze is nice and thick and brown...it is ready. This is also yummy on ham or pork loin!

I put a few slices across my chicken breasts so that the flavor can get under the skin.

Cover the top of the chicken with your bacon.


Now drizzle that amazing glaze you just made all over the top of the bacon and chicken!

Don't be stingy...cover it with glaze!

This is what your chicken will look like when it's done....mmmmmmm......

I had to cut into it immediately and taste it...well it was a little more than a taste! Do you see how the chicken is still juicy?


I served my chicken with a simple salad topped with dried cranberries and a light vinaigrette!

Honestly....this will make you and your family or guests so happy!